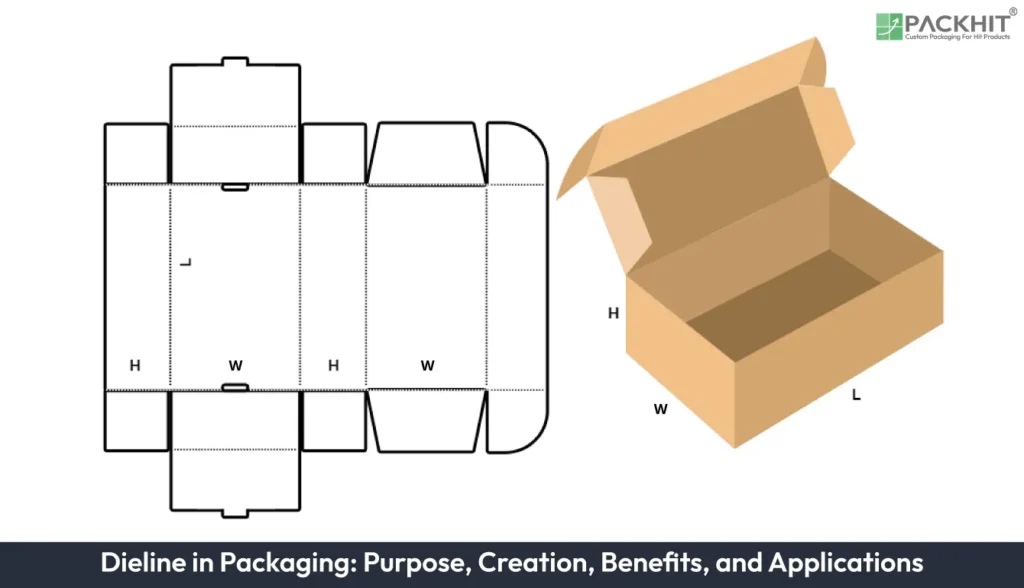
A dieline is a two-dimensional structural template that defines cut lines, fold lines, bleed areas, safe zones, and other production elements for packaging manufacture. The primary purpose of a dieline is to guide the design, printing, cutting, folding, and assembly of packaging while ensuring structural accuracy, production efficiency, and proper artwork placement. Creating a packaging dieline involves defining package dimensions, outlining structural elements, organizing production layers, and testing prototypes to verify manufacturability before mass production. The benefits of using dielines include reducing production errors, improving material efficiency, maintaining brand consistency, and streamlining communication between designers, printers, and packaging manufacturers. Dielines are widely used for product packaging, labels, retail displays, flexible packaging, food and beverage packaging, pharmaceutical packaging, cosmetic packaging, e-commerce packaging, promotional materials, and various printing and finishing operations.
- What is a Dieline in Packaging?
- What is the Main Purpose of a Dieline?
- How are Dielines Created in Packaging?
- What are the Benefits of Using Dielines?
- Major Applications of Packaging Dielines
- Packaging Dieline Technical Specifications Checklist
- What is the Role of Dielines in the Printing of Packaging?
- What are Box Dieline Templates in Packaging?
- Common Errors in Dieline Design and How to Avoid Them
What is a Dieline in Packaging?
A dieline is a two-dimensional packaging template that defines cut lines, fold lines, glue areas, bleed areas, and safe zones for packaging production. It helps designers, printers, and packaging manufacturers create structurally accurate packaging while ensuring artwork aligns correctly during printing, cutting, folding, and assembly. Dielines also support packaging customization, consistent branding, reduced material waste, and efficient manufacturing.
What are the Different Types of Lines and Areas used in a Dieline?
The different types of lines and areas used in a dieline are described below:
- Cut Lines: These indicate where the packaging material will be trimmed to its final shape. Accurate cut lines ensure clean edges and prevent dimensional inconsistencies during production.
- Fold Lines: Instead of cutting the material, fold lines show where the package should be creased and folded. For example, a misplaced fold line can cause front-panel artwork or product windows to shift out of alignment after assembly.
- Bleed Areas: Artwork extends beyond the cut line into the bleed area so no unprinted edges appear after trimming. The required bleed may vary depending on the printer and finishing process.
- Safe Zones: Keep logos, text, barcodes, and other critical elements inside the safe zone to reduce the risk of important information being trimmed or folded during converting.
What is the Main Purpose of a Dieline?
The primary purpose of a dieline is to provide an accurate structural template that guides the design, printing, cutting, folding, and assembly of packaging. It ensures that the final package is functional, visually appealing, and manufactured according to production specifications. By clearly defining cut lines, fold lines, bleed areas, safety margins, and glue tabs, a dieline helps designers position artwork correctly while enabling manufacturers to produce packaging with consistent dimensions and reliable assembly.
A well-prepared dieline also reduces production errors, minimizes material waste, improves print accuracy, and streamlines communication between designers, printers, and packaging manufacturers. In addition, it helps maintain branding consistency by ensuring logos, text, and graphics appear in the intended locations on the finished package, reducing the need for costly revisions or reprints.
How are Dielines Created in Packaging?
Dielines are typically created by graphic designers or packaging engineers using specialized software such as Adobe Illustrator or ArtiosCAD. The process involves defining cut lines, fold lines, bleed areas, and safe zones based on product dimensions and design requirements.
The main steps in dieline creation are listed below:
1. Define Dimensions
Measure product length, width, and height in inches or millimeters. Record irregular shapes by measuring the largest, smallest, and average cross sections. Add clearance for inserts and padding as a starting point (for example, around 1/16 inch per side), adjusting it according to the product and packaging material. Note product weight and any protrusions such as handles or connectors. Place these numbers on a one-page spec sheet for the dieline file.
2. Outline Structural Elements
Map cut lines, fold lines, glue flaps, perforations, and ventilation holes directly onto the template. Set the bleed to approximately 3 mm (0.125 inch), or follow your printer’s production specifications beyond cut lines. Keep important artwork inside a safe zone, typically around 3 mm (0.125 inch), unless your printer specifies otherwise. Mark crease lines as dashed and cut lines as solid to avoid confusion during production. Indicate glue areas and tab positions. Add an allowance appropriate for the board thickness and closure style, which commonly ranges between 2 and 5 mm.
3. Layer Separation
Create distinct layers for dieline, artwork, cutting, and printing marks. Name layers using clear labels such as DIELINE, ARTWORK, CUTTER, and BLEED. Lock the dieline layer and set it to a single spot color that the printer recognizes. Keep photographic images at 300 dpi and place vector art on its own layer. Save working files in AI and export final files as PDF/X for prepress handoff.
4. Test Feasibility
Build at least one digital mockup and one physical prototype to test the dieline. Cut and fold a paper or corrugated sample to check fit, closure, and stacking. Check folding and glue tolerances according to the converting equipment being used. Run a color proof to confirm registration and bleed. If the prototype fails any check, revise the dieline and repeat the prototype step until dimensions and assembly pass.
What are the Benefits of Using Dielines?
The benefits of using dielines are outlined below.
Error Prevention
Every cut, fold, perforation, and glue area is mapped before production begins, reducing the likelihood of manufacturing mistakes. Designers separate structural elements from artwork, while prepress specialists verify bleeds, color modes, and registration before printing. Physical prototypes further reveal fit or closure issues, allowing designers and printers to correct them before full-scale production.
Material Efficiency
Material efficiency becomes especially important during high-volume production, where even small layout improvements can reduce board consumption. A well-planned dieline nests panels efficiently, optimizes sheet utilization, and minimizes unnecessary trim waste. In some cases, simply rotating a panel or reducing an oversized flap can increase the number of packages produced from a single press sheet.
Enhanced Branding
Beyond defining the package structure, a dieline helps maintain a consistent brand presentation throughout production. Safe zones, bleed areas, and registration marks keep logos, graphics, and text properly aligned, while proofing notes preserve brand colors and finishing effects. This consistency is particularly valuable when producing multiple product variants that share the same visual identity.
Major Applications of Packaging Dielines
Major applications of dielines include the following across the packaging and printing industries:
- Product Packaging: Used to create accurate layouts for folding cartons, rigid boxes, corrugated boxes, mailer boxes, sleeves, and custom packaging, ensuring precise cutting, folding, and assembly.
- Labels and Stickers: Define the exact cut shape, bleed area, and safe printing zone for product labels, bottle labels, decals, and custom-shaped stickers.
- Retail Display Packaging: Guide the production of countertop displays, floor displays, hanging displays, and point-of-purchase (POP) packaging with proper folds, slots, and locking mechanisms.
- Flexible Packaging: Used for pouches, sachets, bags, and wraps to specify sealing areas, tear notches, zipper placements, and cutting lines.
- Food and Beverage Packaging: Ensure precise dimensions for cartons, trays, sleeves, takeaway boxes, and beverage carriers while accommodating closures, ventilation holes, and tamper-evident features.
- Pharmaceutical and Healthcare Packaging: Support the production of medicine cartons, blister card packaging, and medical device boxes by accurately positioning folds, glue areas, and regulatory information.
- Cosmetic and Luxury Packaging: Enable the creation of premium boxes with inserts, magnetic closures, windows, embossing, foil stamping, and decorative structural elements.
- E-commerce Packaging: Used to design shipping boxes, subscription boxes, protective mailers, and inserts that improve product protection and packing efficiency.
- Promotional and Marketing Materials: Create custom folders, presentation kits, brochures with die-cut windows, presentation boxes, gift packaging, and promotional displays.
- Printing and Finishing Operations: Provide precise guides for cutting, creasing, perforating, embossing, debossing, foil stamping, spot UV, and other finishing processes to ensure print-to-cut accuracy.
Across these applications, dielines enable manufacturers to standardize logo placement, maintain consistent branding, and customize packaging structures for different products without redesigning the entire production workflow.
Packaging Dieline Technical Specifications Checklist
Before approving a packaging dieline for production, verify that all technical specifications meet your printer’s and manufacturer’s requirements. The checklist below outlines the standard production specifications commonly used in commercial packaging projects to minimize printing errors, improve assembly accuracy, and ensure consistent manufacturing quality.
| Specification | Typical Guidance |
|---|---|
| Bleed | Typically around 3 mm (0.125 in), or according to printer requirements |
| Safe Zone | Usually at least 3 mm (0.125 in) inside cut lines |
| Cut Lines | Use a dedicated spot color on a separate layer |
| Fold Lines | Mark with dashed lines |
| Glue Areas | Clearly identify glue flaps and adhesive zones |
| Artwork Resolution | 300 dpi for raster images |
| File Format | AI for editing, PDF/X for production handoff |
| Layer Structure | Separate dieline, artwork, cutter, and bleed layers |
| Prototype | Digital mockup plus physical sample before production |
| Proofing | Verify color registration, folds, dimensions, and fit before manufacturing |
Actual specifications vary depending on the packaging material, printing method, converting equipment, and manufacturer requirements. Always confirm bleed allowances, file formats, color settings, and structural requirements with your packaging manufacturer or printing provider before finalizing artwork, as production specifications may vary based on equipment, materials, and finishing processes.
What is the Role of Dielines in the Printing of Packaging?
Dielines are essential in packaging printing as they serve as a precise guide for aligning artwork with structural components. They define critical areas such as cut lines, fold lines, bleed areas, and safe zones, ensuring accurate placement of design elements like text and graphics. Proper dieline preparation minimizes errors during printing, enhances the visual appeal of the final product, and ensures consistency in packaging quality. This makes dielines indispensable for achieving professional and error-free packaging results.
What are Box Dieline Templates in Packaging?
Box dieline templates are pre-designed, customizable layouts that specify the structure, dimensions, and folding patterns for box packaging. These templates include key components such as cut lines, fold lines, bleed areas, and safe zones, ensuring precise alignment during production. Box dieline templates are commonly used for creating packaging for retail boxes, shipping cartons, and display boxes, and they help streamline the design process by providing a functional framework tailored to specific product dimensions and branding needs.
Common Errors in Dieline Design and How to Avoid Them
Creating a dieline requires precision, as even minor mistakes can result in costly production issues. Common errors include misaligned graphics, incorrect dimensions, inadequate bleed areas, and improperly placed fold or cut lines. These issues can lead to printing defects, poor assembly, material waste, and delays in production.
To minimize errors and ensure a smooth manufacturing process, keep the following best practices in mind when creating a dieline:
- Use Accurate Dimensions: Double-check all measurements to ensure the dieline matches the product’s final size and structural requirements.
- Include Sufficient Bleed: Extend artwork beyond the trim line to prevent unwanted white edges after cutting.
- Keep Important Elements Within the Safe Zone: Position text, logos, and essential graphics away from cut and fold lines to avoid accidental trimming or distortion.
- Align Graphics Correctly: Ensure artwork aligns perfectly across folds, panels, and edges for a seamless final appearance.
- Clearly Differentiate Cut, Fold, and Perforation Lines: Use separate colors or line styles to distinguish production instructions and reduce manufacturing errors.
- Test with a Physical Mockup: Print and assemble a prototype to verify fit, folds, and overall functionality before sending the file to production.
- Follow Printer Specifications: Adhere to your printing partner’s guidelines for bleed, file format, color mode, and line weights to ensure compatibility.
- Perform a Final Preflight Check: Review the entire design for missing fonts, low-resolution images, alignment issues, and other technical errors before submission.
By following these best practices, you can create accurate, production-ready dielines that reduce errors, improve print quality, and streamline the packaging manufacturing process.