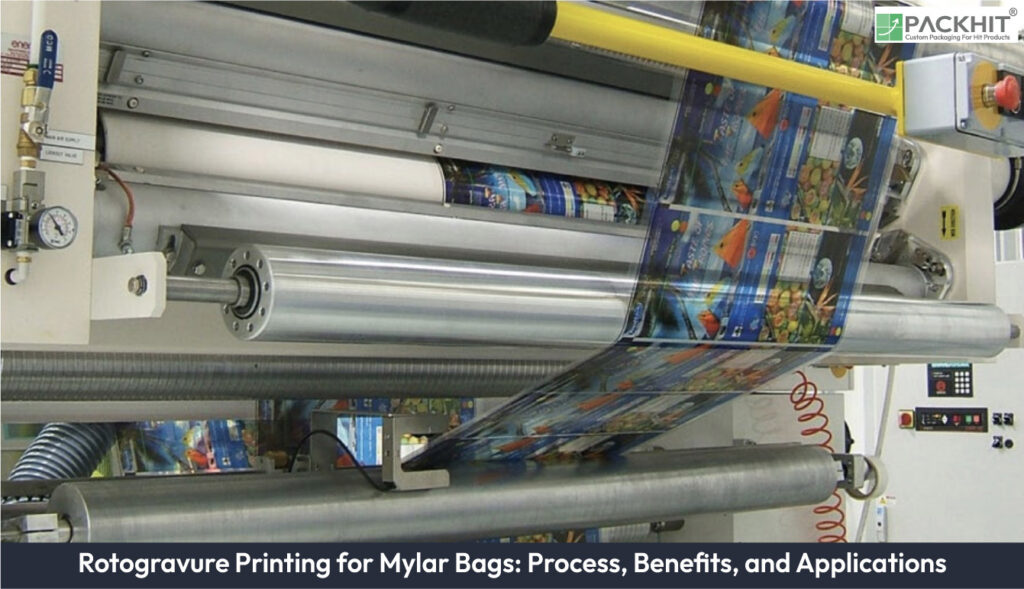
Rotogravure printing for mylar bags is a cylinder-based intaglio process in which engraved cells meter ink onto a moving film web, while separate units print each color with controlled registration and drying. Rotogravure printing on mylar bags transfers ink from engraved cylinder cells to treated film through controlled flooding, doctor-blade metering, impression pressure, and interstation drying. Operators then check ink viscosity, color registration, optical density, and common defects such as streaks, pinholes, banding, and mottling to maintain consistent print quality across the roll. Applications include food pouches, coffee valve bags, snack packaging, medical barrier bags, chemical liners, and retail packaging, with final specifications based on barrier performance, migration limits, seal strength, finish requirements, and cylinder economics.
Rotogravure printing for mylar packaging depends on cell density, cell depth, web speed, surface energy, registration tolerance, and cylinder life. These parameters control tonal detail, ink coverage, adhesion, drying, color alignment, and production cost, so pilot runs should verify dyne level, color difference, and ink solids before full production.
- What is Rotogravure Printing for Mylar Bags?
- What is the Process of Rotogravure Printing on Mylar Bags?
- 1. Flooding the Engraved Cylinder Cells
- 2. Metering Ink With the Doctor Blade
- 3. Pressing the Film at the Impression Nip
- 4. Transferring Ink to Treated Mylar
- 5. Drying Each Printed Color
- 6. Controlling Ink Viscosity and Cell Volume
- 7. Checking Registration and Optical Density
- 8. Correcting Common Transfer Defects
- What Are Typical Applications for Rotogravure-printed Mylar Bags?
- Food Retail Pouches
- Coffee Valve Pouches
- Snack and Confection Packaging
- Medical and Pharmaceutical Barrier Bags
- Industrial and Chemical Liners
- Retail and Fashion Packaging
- Which Process Parameters and Ranges Guide Rotogravure Printing for Mylar Packaging?
- When is Rotogravure the Preferred Technology for Mylar Bags?
- How Should Artwork Be Prepared for Gravure Relative to Flexo?
- How Do Manufacturers Adopt Rotogravure for Mylar Bag Production?
What is Rotogravure Printing for Mylar Bags?
Rotogravure printing is an intaglio, cylinder-based process. Image data sits as engraved cells on a rotating metal cylinder. Cell volume controls how much ink transfers to the film. Cylinders use a copper underlayer with a wear-resistant chrome or nickel topcoat. A doctor blade meters and wipes excess ink.
Each color runs from a dedicated ink unit (examples: cyan, magenta, yellow, black).
Technical Features that Define Rotogravure Printing for Mylar Bags
These technical traits suit rotogravure for high-fidelity, long-run mylar packaging.
- Cell volume control: determines optical density and solid coverage. Larger cell volume increases ink laydown and solid density; typical cell depths range from 10 to 80 μm. Ink type, substrate porosity, and artwork requirements set the usable range.
- Cylinder repeat length: sets artwork layout and pouch pitch. Common repeats measure 200 to 1,200 mm, with the selected length depending on press format, bag dimensions, sealing margins, and the number of pouches placed across the web.
- Cylinder durability: determines total linear meters per cylinder and affects amortization cost. Topcoated cylinders can support approximately 1 to 5 million meters. Cylinder construction, ink chemistry, doctor-blade pressure, substrate abrasion, and press conditions determine the actual service length.
- Halftones: reproduce photographic images and fine text through screened dots. Screen ruling, dot shape, minimum dot size, and register accuracy control detail in product photos, ingredient panels, and other fine imagery.
- Solids: print uniform large areas without screened texture. Background panels, bold brand fields, metallic effects, and opaque white layers require consistent ink transfer across the cylinder width.
- Run stability: maintains consistent ink transfer across long production runs. Repeat SKUs commonly run for approximately 10,000 to 100,000 linear meters, while order quantity, press setup, substrate tension, ink viscosity, drying capacity, and color-register control determine the practical run length.
What is the Process of Rotogravure Printing on Mylar Bags?
Rotogravure printing on mylar bags transfers ink from engraved cylinder cells to treated film through metered ink delivery, impression pressure, interstation drying, and press-side quality checks.
1. Flooding the Engraved Cylinder Cells
Flooding fills each engraved cell with ink as the cylinder rotates through the ink fountain. Cell volume and geometry set the ink load for highlights, shadows, and solid areas, so the engraving must match the required image density.
2. Metering Ink With the Doctor Blade
The doctor blade removes excess ink from the cylinder surface and leaves ink inside the image cells. Blade angle, pressure, material, and edge condition affect streaks, residual film thickness, and trailing-edge smear on the mylar web.
3. Pressing the Film at the Impression Nip
The impression roller presses the mylar film against the inked cylinder to establish contact and pick-up. Nip width, pressure, contact time, and web speed affect dot gain, solid density, and image sharpness.
4. Transferring Ink to Treated Mylar
Ink transfers from the cells to the mylar surface through mechanical contact and capillary action as the film separates from the cylinder. Corona or plasma treatment raises surface energy when poor wetting, mottling, or incomplete transfer appears.
5. Drying Each Printed Color
Hot-air drying removes solvent or water between color stations before the next ink layer reaches the film. The oven profile must match ink chemistry, web speed, ink laydown, and film temperature to prevent trapped solvent, blocking, or weak intercoat adhesion.
6. Controlling Ink Viscosity and Cell Volume
Ink viscosity and engraved-cell volume must remain balanced during the run. Higher cell volume generally requires lower viscosity, while faster web speed requires greater drying capacity or lower ink laydown.
7. Checking Registration and Optical Density
Operators check color registration, optical density, and ΔE during production and at roll changes. Web cameras detect banding and streaks, while densitometry or spectrophotometry verifies repeatable color across the printed mylar roll.
8. Correcting Common Transfer Defects
Banding, pinholes, streaks, low density, and mottling usually trace to cell fill, blade condition, ink viscosity, drying, or surface treatment. Inspect the cylinder and blade, confirm viscosity under press shear, verify the oven profile, and check corona dose before changing several settings together.
What Are Typical Applications for Rotogravure-printed Mylar Bags?
Rotogravure-printed mylar bags serve six primary application categories: food retail pouches, coffee valve pouches, snack and confection packaging, medical and pharmaceutical barrier bags, industrial and chemical liners, and premium retail/fashion packaging.
Food Retail Pouches
Rotogravure suits food retail pouches when you require high-opacity solids and precise brand-color matching across long production runs. Use low-migration inks if no functional barrier separates the ink from the food; examples include certified food-grade solvent systems and aqueous food-grade formulations.
Keep brand panels within a tight color tolerance and verify color with instrument checks, for example, spectrophotometer readings and densitometer spot checks. Validate seal strength and laminate barrier performance for oxygen and moisture before increasing production.
Coffee Valve Pouches
Coffee valve pouches require barrier layers that block light and oxygen, for example, metallized film and multilayer laminates. They demand precise registration for small-text elements like roast dates and batch codes. Include a degassing valve that vents gas but prevents air ingress, and keep its placement tightly controlled relative to printer registration marks. Confirm laminate adhesives bond at the valve area, such as heat-activated or solvent-based adhesives. Run pilot prints that overprint the valve area, including test runs or press trials, to check dot integrity and ink adhesion.
Snack and Confection Packaging
Snack and confection packaging demand uniform solids, metallic effects, and precise multi-color registration. Examples include brand background panels and decorative stripes. For products that undergo steam sterilization, select retort-stable inks and adhesives tested at sterilization temperatures. Handle metallic pastes with low-shear mixing and coarse filtration to prevent cell blockage and metallic flake-off.
Medical and Pharmaceutical Barrier Bags
Medical and pharmaceutical barrier bags require validated low-migration inks, documented clean-room handling, and traceable lot coding. Examples of low-migration inks include food-contact certified solvent systems and tested aqueous formulations. For products that require sterile packaging, manufacturers typically confirm that the sterilization process is compatible with the selected laminate and ink system. Record ink, cylinder, and substrate batches to support production traceability and consistent quality checks.
Industrial and Chemical Liners
Industrial and chemical liners often use chemical-resistant inks, legible hazard markings, and tamper-evident seals. Examples include solvent-resistant pigmented systems and epoxy-modified coatings. Globally Harmonized System symbols and regulatory text can support clear product identification. Chemical-resistance and solvent-rub tests, such as rub-abrasion and solvent-immersion checks, indicate how markings perform during storage. Spout caps and heat-seal strips can provide tamper evidence while helping retain the liner’s barrier properties.
Retail and Fashion Packaging
Retail and fashion pouches use high-density solids, specialty metallic pastes, and surface varnishes to create tactile and visual finishes. Manufacturers plan these jobs for short to medium production lengths. Define varnish gloss level, tactile varnish recipe, and any cold-foil or specialty ink up front. Confirm cylinder economics against expected reorder frequency before ordering additional engraved cylinders.
Application selection depends on measurable factors such as required barrier properties, visual-finish needs, and run economics. For barrier properties, measure oxygen transmission and moisture vapor transmission, among other tests. For visual finishes, specify photographic detail, solid coverage, and metallic effects, to name a few. For run economics, compare expected run length to cylinder cost and reorder cadence, for instance. Select low-migration inks for food-contact and medical applications, and perform migration testing. Apply a primer or raise corona or plasma treatment if adhesion fails on metallized or low-surface-energy film. Validate seal strength and laminate compatibility during pilot runs.
Which Process Parameters and Ranges Guide Rotogravure Printing for Mylar Packaging?
Key process parameters include cell density, cell depth, web speed, surface energy, registration tolerance, and cylinder life.
The table below defines each parameter, its typical range, and the direct effect on tone, solids, drying load, adhesion, and per-unit cost.
| Parameter | Typical range/value | Impact on print |
| Cell density | 60-200 lpi (24-78 lines/cm) | Controls tonal resolution and highlight retention |
| Cell depth | 10-80 μm | Controls ink volume and solid density |
| Web speed | 200-500 m/min (typical) | Affects drying load and solvent evaporation |
| Surface energy target | 38-42 mN/m (dynes/cm) | Minimum for ink adhesion on PET; raise with corona or plasma if lower |
| Registration tolerance | ±0.1-0.3 mm depending on design | Defines print-to-print alignment; affects multi-color registration and diecut fit |
| Cylinder life | Up to millions of linear meters (variable) | Determines amortization and per-unit cylinder cost; set against forecasted run length |
Use this table as a starting point for process design and pilot runs. Adjust cell geometry, ink viscosity, surface treatment, and oven profile based on pilot results. Measure surface energy with dyne tests, color with a spectrophotometer (ΔE), and solids with a densitometer.
When is Rotogravure the Preferred Technology for Mylar Bags?
Rotogravure is preferred when runs are long enough to amortize cylinder cost and when photographic quality, large solids, or metallic effects are required. Choose it when the SKU will run in production volumes measured in tens of thousands to millions of linear meters.
How Should Artwork Be Prepared for Gravure Relative to Flexo?
Prepare artwork with gravure-specific tonal curves and compensate for lower highlight dot gain; provide high-resolution images and define barcode and small-text tolerances because rotogravure reproduces fine detail but requires correct screening and cell-volume mapping.
How Do Manufacturers Adopt Rotogravure for Mylar Bag Production?
Manufacturers adopt rotogravure after they complete a manufacturing‑readiness checklist that covers artwork, cylinder specifications, substrate and surface treatment, ink chemistry, drying and solvent recovery capacity, lamination and seal validation, quality control targets, and environmental and safety compliance.
- Artwork: supply high-resolution separations and tonal curves optimized for gravure; include barcode and small text placement guidelines as examples.
- Cylinder: specify repeat length and engraving method, and order a test cylinder when feasible as an example of risk reduction.
- Substrate: confirm film type, thickness, and whether metallization or primer is required; examples include clear polyester and metallized polyester films.
- Surface treatment: set corona or plasma dose targets and verify with dyne tests as an example of adhesion control.
- Inks: select chemistry that meets regulatory constraints and matches drying capacity; examples include solvent-based, water-based, and energy curable systems.
- Drying and solvent recovery: size oven and recovery equipment to the production line, and solvent load to control emissions and drying performance.
- Lamination and sealing: validate adhesive or extrusion lamination compatibility and run seal strength tests to confirm final package integrity.
- Quality control: establish color difference targets, optical density targets, and registration tolerances, and install an inline color measurement for ongoing checks.
- Environmental and safety considerations: food-contact packaging may require migration testing, while printing operations can involve solvent emissions and site-specific environmental controls. The applicable checks depend on the ink system, bag construction, intended product, production location, and end-use conditions, so manufacturers typically review these factors with qualified packaging, environmental, and safety professionals.
- Maintenance: schedule doctor blade inspection, cylinder polishing, and storage protocols to preserve print quality and cylinder life.
Run a pilot print after the checklist passes. Use pilot data to confirm color, adhesion, seal strength, and drying before approving full production.