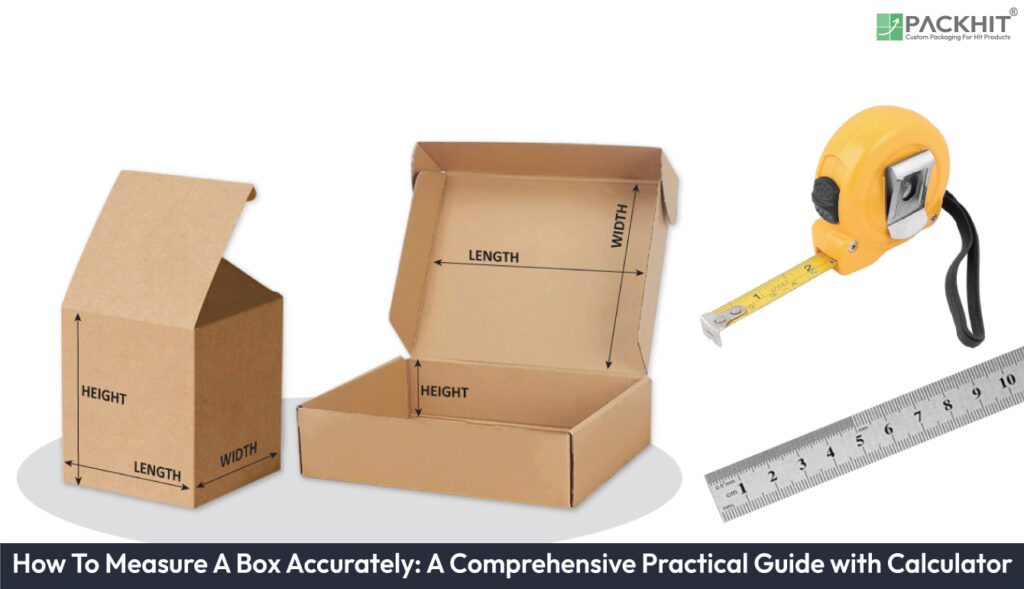
To measure box dimensions accurately, begin by preparing the box on a stable, flat surface. Measure the length along the longest edge, followed by the width of the shorter side, and the height from base to top. Multiply the length, width, and height to calculate the volume, and if required, calculate the girth by adding the height and width and multiplying by two. Be sure to record the measurements and account for allowances like padding around your product.
Accurate box measurements are essential for ensuring efficient shipping, cost-effectiveness, and product protection. Proper measurements help optimize packaging material usage, minimize shipping costs, and reduce the risk of product damage. Tools like rulers, tape measures, calipers, and digital measuring devices are commonly used for precise measurements.
- What to know before Measuring the Box Dimensions?
- What Tools are used for Accurate Box Measurement?
- How to Measure Box Dimensions?
- 1. Place the box on a flat surface
- 2. Measure the length of the box
- 3. Measure the width of the box
- 4. Measure the height of the box
- 5. Calculate the Volume of the Box
- 6. Calculate girth (if required)
- 7. Record measurements
- 8. Account for allowances
- 1. Place the Box on a Flat Surface
- 2. Measure the length of the box
- 3. Measure the Width
- 4. Measure the Height
- 5. Calculate the Volume of the Box
- 6. Calculate Girth (if required)
- 7. Record Measurements
- 8. Account for allowances
- How to Measure the Dimensions of Different Types of Boxes?
- How to Measure the Dimensions of Different Product Boxes?
- What are some Common Mistakes to avoid when Measuring Box Dimensions?
- Why is Precise Box Measurement Important for Product Packaging?
What to know before Measuring the Box Dimensions?
Before measuring the box dimensions, following are the crucial aspects you must keep in mind.
- Using the appropriate measuring tool based on box style.
- Placing the box on a flat surface to avoid inconsistent measurements.
- Recording the box dimension in the standard order of Length × Width × Height (L×W×H).
- Measuring internal dimensions for product packaging and external dimensions for shipping purposes.
- Using consistent units of measurement such as inches or centimeters.
What Tools are used for Accurate Box Measurement?
The measuring tools used for accurate box measurement are listed below:
- Ruler
- Tape Measure
- Yardstick
- Digital Caliper
- Dimensional Scanner
- Laser Measuring Device
- Mobile App with Augmented Reality (AR) Technology
- String
The following image shows eight tools to measure the box dimensions accurately.
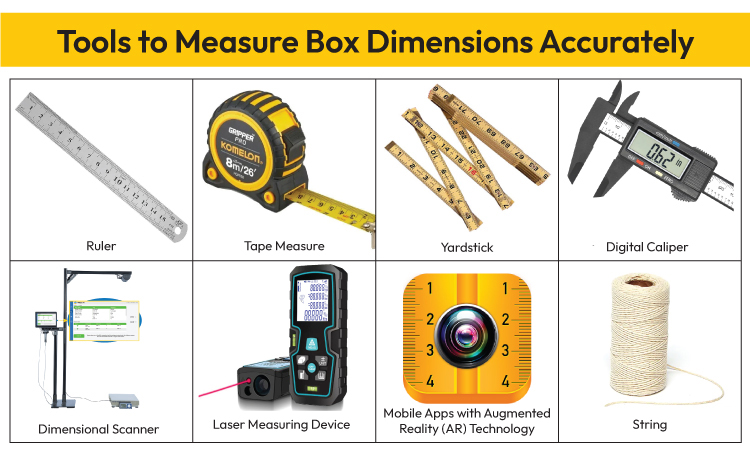
- Ruler: A ruler is a straight measuring tool with inch or centimeter markings, used for precise linear measurements of the length, width, and height of boxes with straight edges.
- Tape Measure: A tape measure is a flexible measuring tool marked with units, used for measuring various box dimensions, including long or wide surfaces.
- Yardstick: A yardstick is a rigid, 36-inch measuring tool ideal for straightforward linear measurements of large boxes due to its extended reach.
- Digital Caliper: A digital caliper is a precision measuring tool with a digital display, used for accurately measuring the internal and external dimensions of rigid boxes.
- Dimensional Scanner: A dimensional scanner is an automated measuring tool that uses lasers, sensors, or 3D imaging to capture exact box dimensions, ideal for industrial and commercial applications requiring fast and accurate measurements.
- Laser Measuring Device: A laser measuring device uses laser technology to quickly and accurately measure distances and dimensions, making it ideal for large or hard-to-reach boxes.
- Mobile App with Augmented Reality (AR) Technology: A mobile app using augmented reality (AR) technology enables quick and convenient box measurements on the go by turning a smartphone into a virtual measuring tool.
- String: A string is a flexible measuring tool used for capturing dimensions of irregular or curved-edged boxes by wrapping it around the box and measuring its length with a ruler or tape measure.
Using the appropriate measuring tool depends on the box’s size, shape, and precision requirements. A ruler or tape measure is ideal for quick dimension measurement, while a digital caliper or dimensional scanner provides higher accuracy. For irregularly shaped boxes, use flexible tools like a string alongside a ruler to ensure precise box measurements.
1. Place the box on a flat surface
2. Measure the length of the box
3. Measure the width of the box
4. Measure the height of the box
5. Calculate the Volume of the Box
6. Calculate girth (if required)
7. Record measurements
8. Account for allowances
This video shows a step-by-step process of measuring the internal and external dimensions of a box using a measuring tape and explains how to calculate the box’s volume and girth, with helpful tips on adding space for cushioning.
1. Place the Box on a Flat Surface
Place the box on a flat, stable surface to ensure accurate measurements. A level surface is essential to avoid inaccuracies caused by tilts or unevenness. Using a spirit level can help verify that the surface is even before starting measurements. When measuring the box for shipping purposes, make sure the flaps are securely closed to capture the correct external dimensions and prevent discrepancies.
The image given below shows a rectangular cardboard box laid on a flat surface, as part of the preparation process for measuring the box dimensions.

2. Measure the length of the box
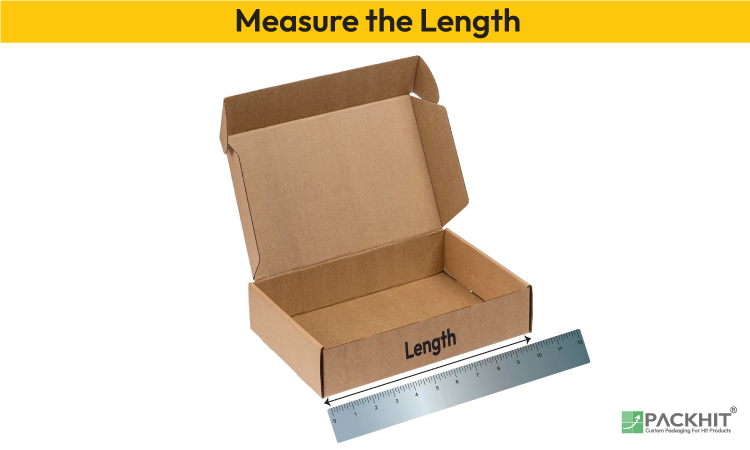
The next step is to measure the length of the box, which refers to the longest internal side. Identify this side first and align a measuring tool such as a ruler or tape measure along the edge of the box. Make sure the measuring tool is flat against the edge and tight to avoid any gaps, as this can lead to an inaccurate measurement.
The image given below shows a mailer box with a ruler placed alongside it to measure the length of the box.
3. Measure the Width
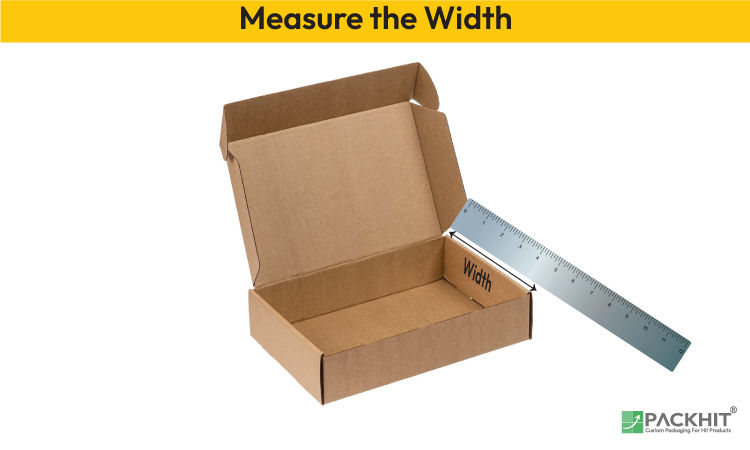
Next, measure the width of the box, which is the shorter side and runs perpendicular to the length. Place the measuring tool at the top of the box and measure across from one edge to the other. Make sure the measuring tool is straight along the edge for an accurate measurement.
The image provided below displays an open mailer box with a ruler placed alongside it to measure its width.
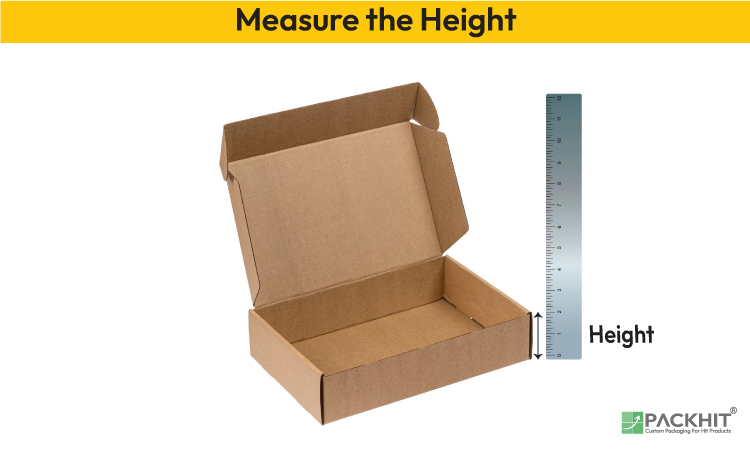
4. Measure the Height
Now, measure the height or depth of the box, which is the internal vertical distance from the bottom to the top of the box. When measuring for external dimensions, include the height of the flaps, as they will contribute to the overall size of the box. If only concerned with the internal space, measure just the vertical interior dimension. Ensure the measuring tool is perpendicular to the base of the box to get an accurate vertical measurement, as shown in the image given below.
5. Calculate the Volume of the Box
To calculate the volume of a box, multiply the length, width, and height to determine how well products will fit inside and optimize shipping, warehousing, and distribution processes.
The formula for calculating volume in cubic inches is given below:
Volume = Length × Width × Height
The image given below illustrates the formula to calculate the volume of the box.

Use the calculator given below to get precise volume measurements for packaging boxes.
Box Volume Calculator
6. Calculate Girth (if required)
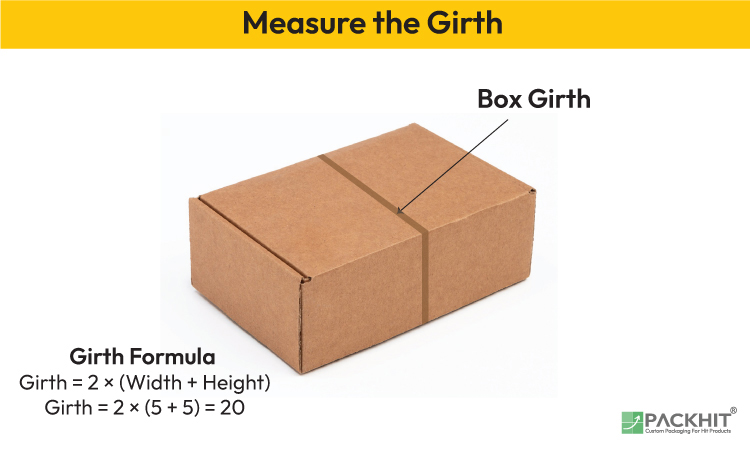
For shipping purposes, some shipping companies will require the girth of the box to calculate dimensional weight. Girth refers to the combined distance around the box. To calculate the girth for a rectangular box, use the formula given below:
Girth = 2 × (Width + Height)
This formula helps determine the total distance around the box, which is essential for calculating shipping costs and ensuring the box fits within shipping guidelines. For irregularly shaped boxes, measure the thickest circumference of the box to calculate the girth accurately.
The following image demonstrates the box girth and the formula to calculate girth.
7. Record Measurements
After taking all measurements, record them in the standard order of Length × Width × Height (L × W × H) as shown in the image given below.

8. Account for allowances
When measuring box dimensions, it is important to consider allowances for cushioning materials like bubble wrap or foam inserts. Adding about 1/8 inch (3mm) to each dimension helps account for manufacturing variances and ensures a proper fit for the contents. This extra space will also help protect the items and maintain the box’s shape during shipping, as shown in the illustration below.

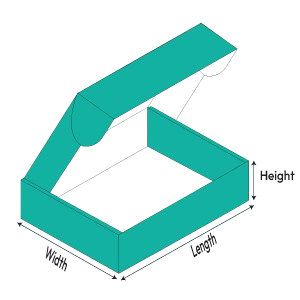
- Mailer Boxes: Mailer boxes are measured by their internal dimensions, focusing on the length, width, and height. The length is the longest side, the width is the shorter side, and the height is measured from the base to the top when the mailer box is closed. Consider design features like self-locking flaps of a mailer box that could impact internal space.
The image of the mailer box given below shows its length as the longest side, width as the shorter side, and height as the vertical distance from the base to the top when the box is closed.

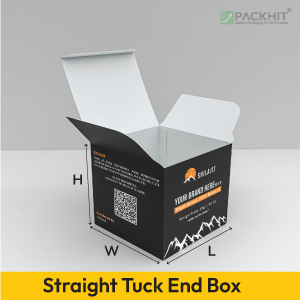
- Straight Tuck End Boxes: Straight tuck end boxes have tuck flaps on both ends, making precise internal measurements critical. Measure the length from the longer side, the width from the shorter side, and the height from the base to the top with the flaps closed. This ensures the straight tuck end box stays secure and the product fits without pushing against the flaps.
The following image shows a straight tuck end box with length (L) as the longest horizontal side of the base, width (W) as the shorter horizontal side, and height (H) as the vertical distance from the base to the top edge when the box is fully closed.
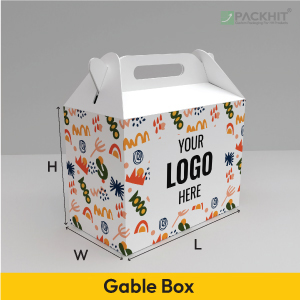
- Gable Boxes: Gable boxes have a unique shape with a gabled top that forms a handle. Measure the internal length, width, and height, including the total height from the base to the peak of the gable. Since the gabled section adds extra storage space, consider this feature when packing taller items or products meant for gift presentation.
The image below of a gable box illustrates its length (L) as the longest side of the base, width (W) as the shorter side of the base, and height (H) as the vertical distance from the base to the top of the handle when the gable box is closed.
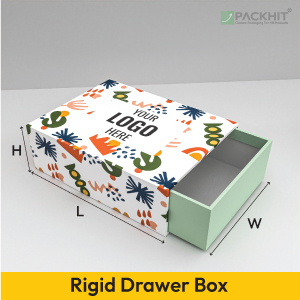
- Rigid Drawer Boxes: Rigid drawer boxes consist of an inner drawer that slides into an outer sleeve. Measure the drawer’s internal dimensions like length, width, and height (depth) to ensure the product fits securely inside. Check the outer sleeve dimensions to guarantee smooth drawer movement and a snug closure.
The image given below shows a rigid drawer box with a sliding compartment, featuring length (L) as the longest side of the outer sleeve, width (W) as the shorter side, and height (H) as the vertical distance from the base to the top of the outer sleeve.
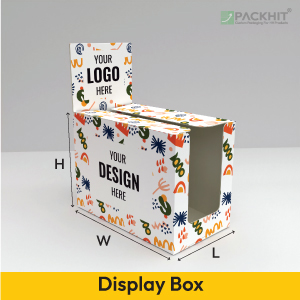
- Display Boxes: Display boxes are designed to showcase products with compartments, cutouts, or shelves. Measure the internal dimensions of the main compartment and any custom sections that hold the product in place. Consider the design of display boxes to ensure the product fits securely and is visible.
The image provided below shows a display box with length (L) as the longest horizontal side of the base, width (W) as the shorter horizontal side, and height (H) from the base to the top of the raised display header.
- Magnetic Rigid Boxes: Magnetic rigid boxes have a magnetic closure as a key design feature. When measuring a magnetic rigid box, consider the thickness of the walls and the placement of the magnets, as these can affect the internal dimensions. Ensure you measure the external dimensions (length, width, and height) when the box is closed, and take internal measurements from the inside, excluding the wall thickness and magnet areas to ensure a proper product fit.
The picture below shows a magnetic rigid box with length (L) as the longest horizontal side of the base, width (W) as the shorter horizontal side, and height (H) as the vertical distance from the base to the top of the box lid.

Accurately measuring the internal dimensions and accounting for design features like flaps, compartments, and additional sections for different box styles help ensure a proper fit, enhanced product protection, and efficient shipping.
- Positioning the box incorrectly while measuring: Positioning the box incorrectly while measuring can cause inaccurate dimensions. Always place the box on a flat, stable surface to ensure precise measurements of its length, width, and height.
The image displayed below illustrates how incorrect positioning of the box during measurement can lead to inaccurate dimensions.

- Measuring only the external dimensions: Measuring only the external dimensions can lead to errors in shipping and packaging. External dimensions are crucial for shipping calculations, while internal dimensions ensure the product fits properly, as industry standards are based on them. Box wall thickness, especially in corrugated cardboard, reduces interior space, making accurate internal measurements essential for effective packaging.
The following picture demonstrates how measuring only the external dimensions can lead to errors in shipping and packaging.

- Using inconsistent units: Using inconsistent units can lead to measurement errors and calculation issues. Always use the same unit, such as inches or centimeters, for all box dimensions. Mixing units can cause confusion, incorrect volume calculations, and sizing mismatches, impacting shipping and packaging accuracy.
The visual below illustrates how using inconsistent units can lead to measurement errors and calculation issues.

- Not including space for padding or protection materials: Not including space for padding or protection materials like foam, bubble wrap, or packing peanuts while measuring box dimensions can lead to insufficient protection for the product, increasing the risk of damage during shipping. Always account for padding, foam inserts, or bubble wrap to ensure a secure fit.
The picture below illustrates how ignoring space for padding, like foam or bubble wrap, when measuring box dimensions can lead to insufficient protection and shipping damage.

- Not considering the thickness of the material: Not considering the thickness of the box material can lead to incorrect measurements, as the material’s bulk adds to the external dimensions, reducing the internal space. This can result in boxes that are too small for products, compromising product safety and leading to inaccurate shipping calculations.
The image shown below highlights how not considering the thickness of the box material can lead to incorrect measurements.

Avoiding these common mistakes ensures that your box will be appropriately sized for its contents and reduces the risk of shipping or storage issues.
- Product Safety: Accurate measurements ensure a snug fit for the product inside the box, minimizing product movement and reducing the risk of damage during transit. A well-fitted box prevents impacts, vibrations, or crushing that can occur during transportation. Measuring the internal dimensions of the box to match the product’s dimensions is vital for a secure fit.
- Material Optimization: Measuring the boxes precisely also helps optimize material usage by ensuring the packaging is the appropriate size for the product. This approach minimizes the use of excess materials, which supports sustainability goals and reduces environmental impact.
- Cost Savings: Right-sized packaging cuts costs by reducing material use, lowering production expenses, and minimizing shipping fees based on dimensional weight. Efficiently sized packaging optimizes warehouse storage, reducing storage costs and improving logistics efficiency.
- Sustainability and Waste Reduction: Correct box dimensions reduce packaging waste and promote sustainability by using only the necessary materials, lowering environmental impact. This practice enhances brand image and appeals to eco-conscious consumers by demonstrating a commitment to responsible packaging.
- Branding and Aesthetics: Precise box measurements enhance branding and aesthetics by ensuring a perfect fit, preventing product damage, and creating visually appealing packaging that reflects the brand’s quality and strengthens customer perception.
Accurate box measurements minimize damage, cut shipping expenses, and improve customer satisfaction while supporting sustainability.

A well-fitting box enhances the unboxing experience, positively impacting customer satisfaction and brand perception, especially in e-commerce. Unlike exterior dimensions, which include material thickness, focusing on internal dimensions ensures the proper fit and effective packaging, improving safety, efficiency, and the overall customer experience.
- Measure the exterior dimensions: Use a rigid measuring tool, such as a ruler or tape measure, to measure the length, width, and height of the package, including the flaps. Make sure to measure to the outermost points of the box. Take the measurements in inches. Round up each measurement to the nearest whole inch.
- Calculate the volume: Multiply the length, width, and height to get the cubic volume.
- Divide by the Dimensional (DIM) divisor: Divide the cubic volume by the dimensional factor, which is a number set by the carrier representing the minimum acceptable density. The divisor depends on the measurement units (inches or centimeters), the shipping mode (air or ground), and the carrier. For example, FedEx and United Parcel Service (UPS) use a divisor of 139 for domestic shipments in inches, while United States Postal Service (USPS) uses 166 cubic inches per pound for domestic and 194 cubic inches per pound for international shipments.
- Determine the dimensional weight: If the calculated dimensional weight is higher than the actual weight of the package, the shipping cost will be based on the dimensional weight.
Dimensional weight helps determine shipping costs for bulky, lightweight packages by using the package’s volume and a carrier-specific divisor to calculate a weight that may impact the final shipping charge.
- Including Flaps Incorrectly: Exclude flaps for internal dimensions but include them for external dimensions.
- Not Rounding Up: Always round dimensions to the nearest whole inch as required by carriers.
- Overlooking Carrier-Specific Limits: Check size thresholds to avoid surcharges. For example, USPS (United States Postal Service) allows up to 108 inches for the combined length and girth for standard services. Exceeding this limit may result in extra fees or require a different shipping service.
Understanding and avoiding these common mistakes can help ensure a smooth and cost-effective shipping experience.
